Posts

Showing posts from October, 2017

Describing the image

Image
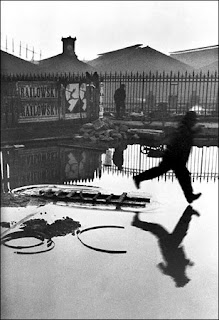
The image is haunting as you don't know what is going to happen as well as the mist that is behind the fence it also has a spooky atmospheric feel to the image. The image is in Black and white. the image also creates tension due to you not knowing what happens next. the medium of this piece of work is decisive moment and is also street photography. The image makes me disturbed because i don't know what happens after the image because it is just one moment in time. r

Darkroom work

in the darkroom I turned my film into images using the enlarger. you first take the negative holding tray out of the enlarger then take it out of the darkroom and find the part of the film you want to dewlap and make sure it is clean before putting it into the enlarger you then turn the enlarger on and make sure that it is focused and fills the frame. cut a test piece and find out if the exposure, focus and size are correct then take a whole piece of the paper and run the machine then put it though the developer which make the image visible and able to leave the darkroom. I took a lot of tests before I found one that I was happy with my finished image.

Graphics week write up

Image
materials  paper pencil rular computer scanner process  illustrator- we learnt how to trace using the pen and pencil tool in design - made a mock magazine cover scanning -scanned our hand done typography into the computer Technical Skills Tracing in illustrator using in design  scanning in work  we first took some cameras and went around the college trying to find objects that looked like letters we then downloaded them on to memory sticks. later in the day. we hand did typographey  We also used the lines to help structure the size and style of the typography. We also had to chose a style to base are typography off for example bubble writing. I chose to base my typography of bubble writing as i don't have much skill with hand drawn letters or anything hand drawn.  We later used the images we took to create a mock magazine cover. Using in design which is a software made by adobe graphic designers use this software when creating the

Health And Safety In The Dark Room

Health and Safety In The Dark Room Make sure that the ventilator is on when working in the darkroom as the fumes from the chemicals are dangerous   Make sure you use gloves if you have any allergies  do not come into physical contact with the chemicals in the tray  Do not use a phone while in the darkroom  Do not mix the tweezers  Always tidy up the props you used in the darkroom Always segregate the chemicals don't mix them  Keep the work area clean to prevent tripping over chemical bottles 

Art and Design Week

Image
Materials Pencil Pens Graphite Charcoal Paints Paint brushes Process Experimenting with using other objects besides paint brushes to create a mark. Drawing textured marks. Technical skills Creating texture using dry and wet media. In the first lesson we used wet and dry media to create a collection of textured marks such as layered lines and scribbles. We then split a A3 into 10 different sized areas. Which we filled with different textured marks. The dry media was stuff like pencils, pens, graphite, and charcoal. The wet media was paints both white and black. In the second half of the day we did print making. we did this with textured wallpaper and oil based ink which meant it was permeant after it was dry. so we had to wear clothes and and apron so that it didn't get on your clothes. The wallpaper was used to create prints. the process we used to print was rolling out a little bit of ink onto a piece of acetate which we then put the wallpaper textured s